Burning Text Fire Effect With Glossy Reflection – Part 2
Text on Fire effect with glossy reflection is a great Photoshop special effect. Today I will be continuing with my Tutorial on how to design a “Burning Fire effect with Glossy reflection” Part – II.
This is a continuation of my first part, this is the part II of Text on fire with glossy reflection effect Photoshop tutorial. You will need to read the Part-1 to be able to understand and finish this tutorial.
This effect that can be achieved without much skill, however, if you have little knowledge about layer’s, Layer effects, usageof Mask etc, will definitely help.
But don’t worry, you can do it if you follow this tutorial step by step. I have tried to show as many images as possible to make it easier to understand and follow.
Text on Fire effect with glossy reflection – Part – II
Before you proceed Please read this Part – 1, since this is a continuation tutorial, you won’t understand. After you complete the part – 1 , please come back and follow this part –II to complete the “Fire effect with glossy reflection”
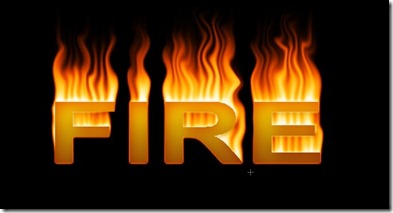
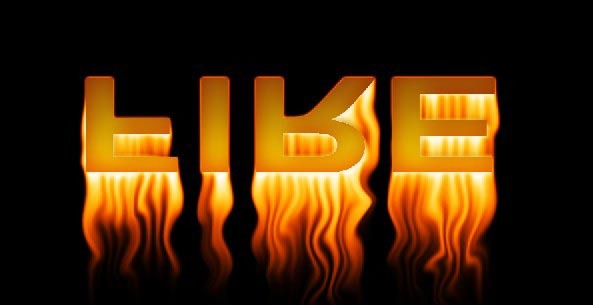
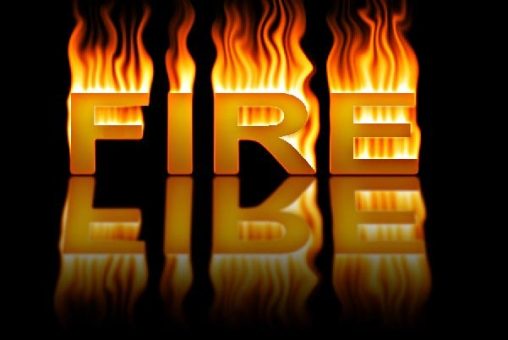
From Part –1 of this Tutorial, we already have achieved to get this Image shown below.
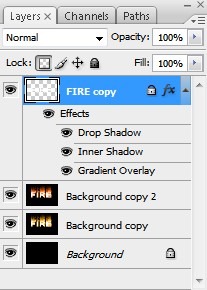
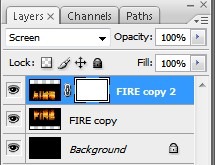
PART- II STEP: 1 If you look at your Layer pallet in Photoshop you will see this.
Here you can clearly see the layer effects we have applied earlier in Part –1 to the top layer of the text “FIRE”.
Now press and hold the “Shift” key on your keyboard and click on the layer “Background copy” this will select all the layers in between, except the original “Background” layer.
Once selected (selected layers will be highlighted with blue color) now press CTRL + E key on your keyboard, this will merge all the selected layers without interfering with the layer effects applied to the top text layer. Now you will have only two layers as shown below.
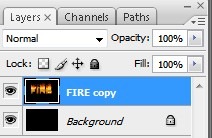
STEP :2 Now as you can see you have two layers only. Right-click on the “FIRE copy” layer and from the menu click on the “Duplicate layer”. this will make a Duplicate layer of the Fire copy layer. as shown below.
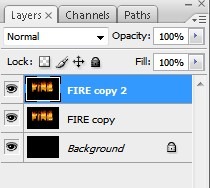
STEP : 3 This part is going to be a little bit tricky, where we will be giving the Glossy effect to the Text layer.
This tutorial from Step-1, onwards, is a bit different from other Photoshop tutorials, but I found this procedure to be easier and gives a better result.
OK ! now make sure the top layer “Fire copy2” is selected, now go to EDIT >> Transform >> Flip vertical. and you will get this image.
STEP: 4 Don’t be alarmed, your Image is still intact, it’s just the background Black layer which we applied to the Text layer in Part-1 is blocking the view of the layer beneath it.
To make it see-through, make sure that the top layer”Fire copy 2” is selected and click on the blending options in the layer pallet and from the drop-down menu select the option “SCREEN”.
All the layer’s beneath this layer will be visible. The “screen” blending option basically makes all-black color transparent, a very handy and useful blending option for masking. Your Image will now look like this.
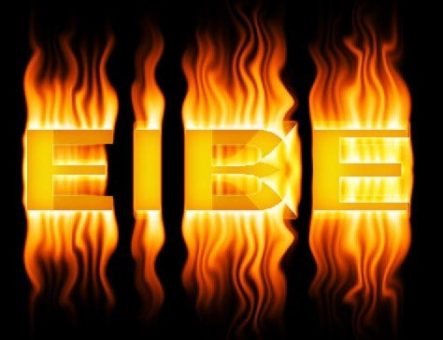
STEP: 5 Everything looks upside down, don’t click or move the image layers now, the images are perfectly aligned as a mirror image.
Now click on the move tool on the left menu bar of Photoshop, and on your key-board keep on tapping the “down arrow” key ( make sure that the top layer”Fire copy 2”) the flipped layer is selected.
This will drag the top flipped layer down, bring it down enough to align it with the second layer at the base, just keep a few pixels gap in between them (shown below)
STEP: 6 Now we have our reflected Image in place, but not finished yet. Reflected Images are not sharp, and tend to fade away and also not of the same size, so we need to do some more work on it.
STEP 7:
Now select this tool Rectangular marquee tool and select an area on the reflected text, the selected area should just cover the image area only as shown below, to transform the selected area go to Edit >> Transform >> Distort ,this will create a box around the selected area with four NODES on the corners.
Then with the left mouse button click and drag on the right Transform node just a little bit to the right to distort the Image, similarly click and drag on the left Transform node and drag the node towards left side, same amount as you did on the right node. shown below.
STEP 8: Once you are satisfied with the transformation, press enter, then press CTRL+D to deselect the area.
Since a reflected Image tends to fade away, we need to apply a gradient with a mask on the reflected layer. To do that click on the MASK icon at the bottom of the layer pallet, once you activate this you will see a Mask applied on the layer pallet,
(Mask layer applied to the reflected layer). Now click on the gradient tool, and make sure that Photoshop has the default color on, which is Black as the foreground color and white as background color.
After selecting the Gradient tool, check that on the top just below the Menu bar the Gradient tool should be displayed like this black to white gradient.
Now with the gradient tool active click on the mask layer to make it active and then click on the reflected text and drag vertically down right up to the end of your document.
This will make the layer gradually fade starting from top towards the bottom. You can repeat this untill you are satisfied with the outcome. The aim is to make the reflected text layer fade out.
STEP 9: Since reflected Images are not sharp, we have to blur this image a little bit, for this first select the Image now (not the mask ) go to Filter >> Blur>> Gaussian blur >> and in the Radius put 2 (this is up to you, you can reduce or increase the blur effect according to your liking), then click OK.
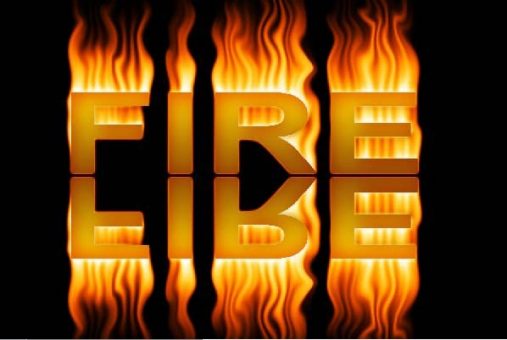
That’s it , your finished Image now should look like this, text on fire with glossy reflection.
I hope I could explain it properly? I have tried my best to show as many images as possible to make it easier to follow. If you found it difficult to follow don’t hesitate to leave a comment I’ll be glad to help you out (as far as I can). Don’t forget to read the PART-1 of this tutorial
Hello! I am Ben Jamir, Founder, and Author of this blog Tipsnfreeware. I blog about computer tips & tricks, share tested free Software’s, Networking, WordPress tips, SEO tips. If you like my post /Tips then please like and share it with your friends.
1 thought on “Text On Fire Effect With Glossy Reflection Photoshop Tutorial Part 2”
Glad to hear that !! You can use these methods to create many special effects in Photoshop.All the best
Comments are closed.
We use cookies on our website to give you the most relevant experience by remembering your preferences and repeat visits. By clicking “Accept”, you consent to the use of ALL the cookies.
This website uses cookies to improve your experience while you navigate through the website. Out of these cookies, the cookies that are categorized as necessary are stored on your browser as they are as essential for the working of basic functionalities of the website. We also use third-party cookies that help us analyze and understand how you use this website. These cookies will be stored in your browser only with your consent. You also have the option to opt-out of these cookies. But opting out of some of these cookies may have an effect on your browsing experience.
Necessary cookies are absolutely essential for the website to function properly. This category only includes cookies that ensures basic functionalities and security features of the website. These cookies do not store any personal information.


Glad to hear that !! You can use these methods to create many special effects in Photoshop.All the best