How to convert photos to beautiful realistic pencil sketch in Photoshop. Don’t worry, you don’t need artistic talent to do that. Nor do you need a third-party software to convert photo to pencil sketch.
This is a very simple easy to follow Photoshop tutorial. Follow these steps, and you will be surprised how easy it is to convert photos to pencil art, in Photoshop.
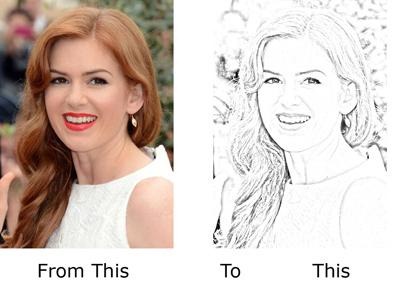
This is what we will achieve at the end of this tutorial.
Convert Photo to Pencil sketch in a few steps in Photoshop
TIP:Choose a good quality high-resolution headshot photo. You can use your own photo or download one from any Free Stock photos.
Step 1: Open your photo in Photoshop. Make a duplicate copy by pressing Ctrl + J in windows or Cmd + J in mac.
Step 2: Select the duplicate layer, desaturate the image (black and white) either by using the key combination Ctrl + shift + U. You can also go to Image – adjustments – desaturate. Your image will become B & W
Step 3: Now duplicate the B&W layer by pressing Ctrl + J as mentioned above.
Step 4: Make sure the duplicated B&W layer is selected. Now we need to invert this image.
Invert the image by pressing Ctrl +I in windows or Cmd + I on Mac. Alternately you can go to Image – Adjustments – Invert. Now your Image will look like a Negative.
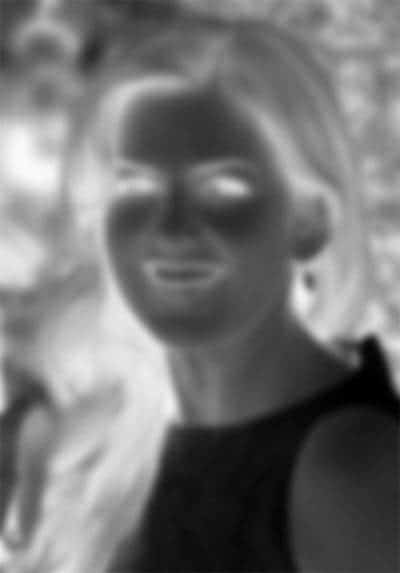
Step 5: Make sure the negative image layer is selected. Now go to the layer Blending options in the layer pallet and select “Color Dodge”.
Your image will disappear and the document will be completely white.
Step 6: We are almost finished … from the menu select Filter – Blur – Gaussian Blur. You will immediately see the outline of the Image.
All you have to do is to adjust the amount of radius for the Gaussian blur. Make sure Preview is checked, so you can see the change as you adjust the amount of radius.
There is no fixed amount, this will depend on your image resolution.
For this image, I used radius 9, which looked good.
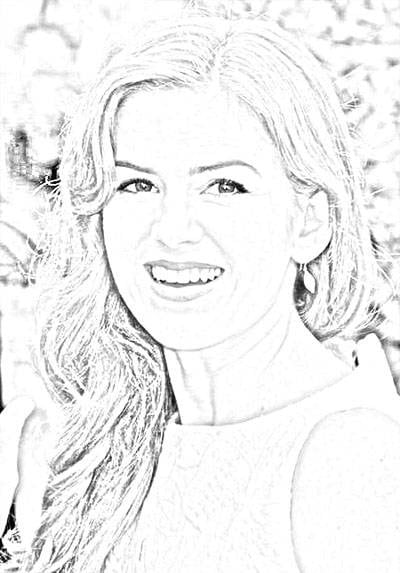
Depending on the size of the image you are working on, you may have to increase or decrease the radius. And this is what you will get.
That’s it, I hope you have enjoyed this tutorial on how to convert photo to pencil sketch in Photoshop.
Any confusion or doubt, you are welcome to comment. I will be happy to help.
Additional Tip
If the final image is too light. Flatten the layers and use the Levels tool to darken it a bit to your liking. You can also use the burn tool to darken certain areas, like the eyebrows, eyes, nose, etc.
If you want to make colored pencil art. Duplicate the original layer(colored) drag to the top of all layers and select color in the layer blending option. Adjust the layer opacity as per your liking.
Hello! I am Ben Jamir, Founder, and Author of this blog Tipsnfreeware. I blog about computer tips & tricks, share tested free Software’s, Networking, WordPress tips, SEO tips. If you like my post /Tips then please like and share it with your friends.
We use cookies on our website to give you the most relevant experience by remembering your preferences and repeat visits. By clicking “Accept”, you consent to the use of ALL the cookies.
This website uses cookies to improve your experience while you navigate through the website. Out of these cookies, the cookies that are categorized as necessary are stored on your browser as they are as essential for the working of basic functionalities of the website. We also use third-party cookies that help us analyze and understand how you use this website. These cookies will be stored in your browser only with your consent. You also have the option to opt-out of these cookies. But opting out of some of these cookies may have an effect on your browsing experience.
Necessary cookies are absolutely essential for the website to function properly. This category only includes cookies that ensures basic functionalities and security features of the website. These cookies do not store any personal information.