In this simple and easy-to-follow tutorial, you’ll learn how to create a 3D cut-out text effect in Adobe Photoshop. You can apply this effect to any text in Photoshop. You can make use of this effect for magazine layouts or posters.
Let’s make a 3D cutout text effect in Photoshop. A very simple easy to follow Photoshop tutorial. End result is a very interesting cutout text effect, which you can use as a logo or anything you can think of.
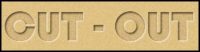
This is what we are going to achieve at the end of this tutorial.
Follow these steps
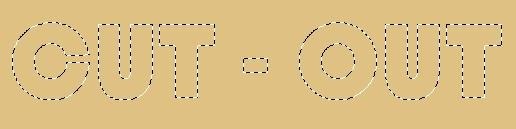
– Open a new transparent document in Photoshop – Choose any color (should not be dark color) and use the paint bucket tool to fill the document. I used #dfc184 – Now press Ctrl+J on the keyboard to duplicate the layer. – Choose the type tool and choose the same color for the Text as the background color. – Type your word any word you want. Obviously, you won’t see anything when you type, as the text color and the background is the same. – When you use the type tool, Photoshop automatically makes a new layer. Now press the control button on the keyboard and click on the text layer. This will make a selection of the letter.
Rasterize the text layer
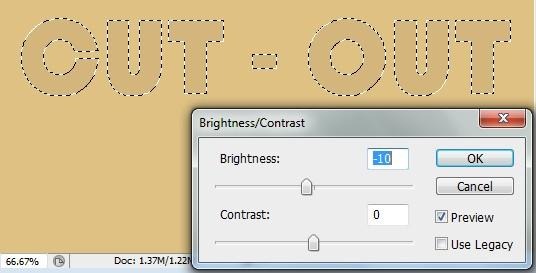
– Now we will need to render (rasterize) the text layer. Click on the layer menu – rasterize – type. – Next, darken the text a little bit. Go to Image – Adjustments – brightness, and contrast, and reduce the brightness to –10.
– Now let’s add some inner shadow effect to the text. For this you can double click on the text layer to bring the “Blending options” or go to Layer – layer styles – under blending options – click on Inner shadow.
I used the following settings. This is not fixed, you may need to lower or increase the settings depending on the size of your Text. Blending mode – multiply opacity: 75 Angle: 120 Check: use global light Distance: 5 Choke: 5 Size: 9
Now your text should look like this.
Keeping the text selected, select the background copy layer. Create a new layer above it. The idea is to create a new layer just below the text layer.
– Click on the eye icon of the text layer to hide it. Your text selection will remain. – Make sure the new layer is selected. Choose white as the foreground color and fill it with the paint bucket tool. This will fill the selected text with white. – Go to Filter – Blur – Gaussian blur, use radius 2.5.
– Now click on the eye icon of the text layer to see the text layer. Press Ctrl + D to deselect the text. – Select the Move tool or press on V, and move the white text layer 2 pixels down and 2 pixels to the right with Arrow keys, tapping twice. Single tap moves by 1 pixel.
Lower the layer opacity to 70%. This is what you will get.
– If you want, you can stop here. But it looks too plastic. So let’s add some noise. – First, hide the background layer. Select the duplicate background layer, name it Noise. – Go to filter – Noise – Add noise, I used the settings, Amount 8, Distribution – uniform, and Monochromatic. – Next, select the Text layer to apply the same noise effect. – Unhide the background layer and adjust the opacity of the noise layer. I reduced it to 40%.
Your Final Image should look like this
That’s it. The final image. Cool 3D cutout text effect in photoshop.If you want you can try reducing the text layer brightness further.
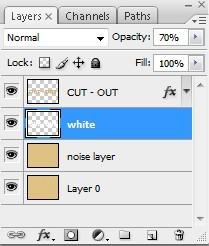
If you are confused your Layers pallet with all the layers should look like this.
Hello! I am Ben Jamir, Founder, and Author of this blog Tipsnfreeware. I blog about computer tips & tricks, share tested free Software’s, Networking, WordPress tips, SEO tips. If you like my post /Tips then please like and share it with your friends.
We use cookies on our website to give you the most relevant experience by remembering your preferences and repeat visits. By clicking “Accept”, you consent to the use of ALL the cookies.
This website uses cookies to improve your experience while you navigate through the website. Out of these cookies, the cookies that are categorized as necessary are stored on your browser as they are as essential for the working of basic functionalities of the website. We also use third-party cookies that help us analyze and understand how you use this website. These cookies will be stored in your browser only with your consent. You also have the option to opt-out of these cookies. But opting out of some of these cookies may have an effect on your browsing experience.
Necessary cookies are absolutely essential for the website to function properly. This category only includes cookies that ensures basic functionalities and security features of the website. These cookies do not store any personal information.