The blogger Blogspot blog doesn’t come with menu tabs as a standard template feature. But you can use the workaround solution by using the Category ( Labels) as tabs to the blogger navigation bar.
How do I add My Labels (Category) as Tabs? on the horizontal navigation menu bar that will show all the posts that fall under that category in Blogger? This one question has been bothering me for quite some time. With the number of Posts increasing the Labels list has been growing longer, taking up my side Bar completely.
If you search the net on this topic “How to add Labels as Tabs on the Navigation Bar” you will get thousands of posts, some a bit confusing for beginners others suggests putting some codes in your Blogger template to achieve that.
For some reason, I didn’t want to fiddle around with my Template HTML unless it’s necessary.
In this post, I will show you a very simple method of placing all Categories (Labels) as tabs to the Bloggers Navigation menu,(shown above) that would show all my posts under that particular Category.
Page Contents
Add category As Tabs To Bloggers Navigation Menu
If you know how to label and categorize your blog posts properly, then jump to the next section.
This is important to achieve the purpose of this tutorial. If you have done the right way then you already have your “Major Categories” of Labels for Posts. If not, then do the following steps first.
First of all, write down the names of Categories (Menus) you want to have. Assuming you have a variety of posts under different categories.
Just, for example, let’s say you have identified four different types of categories of POSTS as Label-1, Label-2, Label-3, and Label-4. This is just an example, you can name your categories according to the topics you write (More on that later).
How to Label multiple posts in bulk
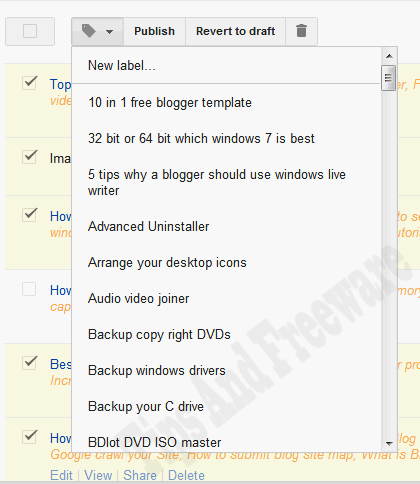
Log on to your Blogger account- go to Posts- here you will see all your Posts already Published.
Now select by putting checkmarks on all the posts that you want to put under the category say LABEL-1 (example only). Then on the top click on the drop-down menu on the label, here select “New Label” as shown below.
On the Label Box type your Labels name, here as an example “Label-1” then click OK.
All your selected posts will have the label “Label-1” along with the other labels, which you have already labeled. Here the label “LABEL-1” is your Major Label category having a certain number of posts under this category.
Likewise, you can categorize the remaining posts under different categories. But before you select other posts for your second category, first de-select all posts and then select the posts for the second category, do this every time you need to select posts for different categories.
Now that you have successfully labeled all your posts (Major category)- go to Layout on your blogger’s dashboard
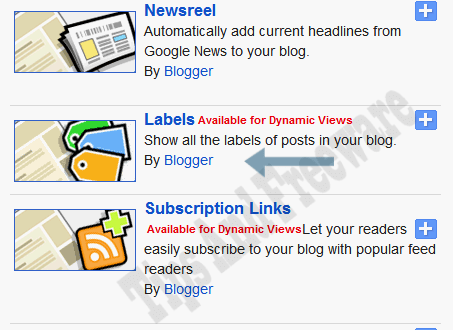
Click on “Add a Gadget” from the gadget menu and add a “LABELS” gadget, name the gadget as CATEGORY.(Doesn’t matter if you don’t name it also, this is just to differentiate it from other gadgets that you may have) Now on your Blogger Layout window drag this Gadget and place it just under your Blog title. Then click on “Save arrangement” your Label gadget is now in place.
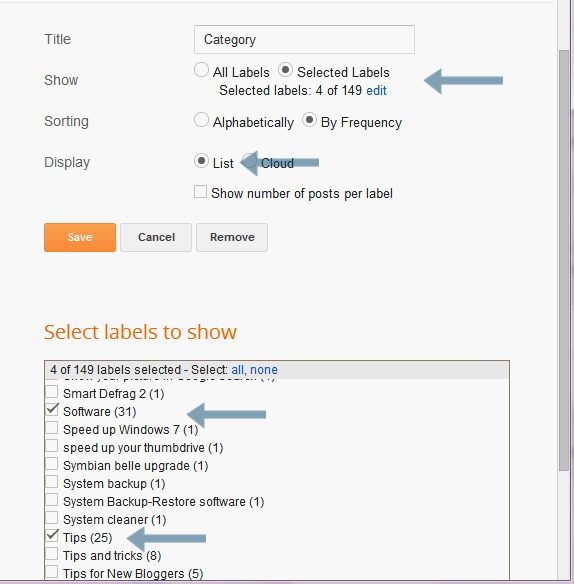
Now click on the edit menu of your “Category” label gadget, here click on Edit and you will see the complete list of Labels for all your published posts, by default all will be selected, de-select all.
Under show Select “Selected Labels”, and under “Display” select list, then scroll down to the list of Labels, here you will see (example) the number of posts under “LABEL-1”, LABEL-2, etc. depending on the number of posts you selected earlier.
In the image below you can see under Software Category, I have 31 blog posts. Because in my first category, I selected all these posts and labeled them as Software.
Select all the Major Category labels (as shown above, this is my label gadget where you can see I have 31 posts under the major category SOFTWARE).
For the purpose of this tutorial we made 4 major categories, in your case it could be less or more.
After you have selected all the Major category Labels, at the bottom click on “DONE” then click on “SAVE”.
That’s it, Now you can preview your Blog and you will see your labels appearing as Tabs just below your Blog title.
When you click on any of the Tabs it will show all the posts under that particular Label only. This I found to be the easiest way to add the category as tabs in the blogger’s navigation menu.
Bonus Tip
You can have a maximum of 5 or 6 Major category Tabs, more than that spills over, of course, that depends on the width of your Template.
Well, I enjoyed writing this post. Was it helpful? Very simple to do and doesn’t require you to add any extra code. At any time if you don’t want it you simply delete the category label gadget and it’s gone.
If you have enjoyed this post, maybe you would like to subscribe for free E-mail notification for all new posts and updates.
Hello! I am Ben Jamir, Founder, and Author of this blog Tipsnfreeware. I blog about computer tips & tricks, share tested free Software’s, Networking, WordPress tips, SEO tips. If you like my post /Tips then please like and share it with your friends.
2 thoughts on “How to Add category (Labels) As Tabs To Blogger Navigation Bar”
Thank you. Now I have tabs too!
Hello !! Interventizio Great !! it worked ! do subscribe for any future updates. Happy blogging
Comments are closed.
We use cookies on our website to give you the most relevant experience by remembering your preferences and repeat visits. By clicking “Accept”, you consent to the use of ALL the cookies.
This website uses cookies to improve your experience while you navigate through the website. Out of these cookies, the cookies that are categorized as necessary are stored on your browser as they are as essential for the working of basic functionalities of the website. We also use third-party cookies that help us analyze and understand how you use this website. These cookies will be stored in your browser only with your consent. You also have the option to opt-out of these cookies. But opting out of some of these cookies may have an effect on your browsing experience.
Necessary cookies are absolutely essential for the website to function properly. This category only includes cookies that ensures basic functionalities and security features of the website. These cookies do not store any personal information.


Thank you. Now I have tabs too!
Hello !! Interventizio
Great !! it worked ! do subscribe for any future updates. Happy blogging