How to create a starburst effect in Photoshop and make your pictures more enticing and eye-catching. This starburst effect has been used by the advertising industry for decades. To beat a very skilfully composed starburst effect is difficult.
There are several different methods to create a starburst effect in Photoshop. Let’s see how we can create this starburst effect in Photoshop.
In this tutorial, we will try to create a starburst effect in Photoshop with the two most popular techniques, used for creating hard-edged and soft-edged starbursts.
Remember this will form the basic foundation, which you can use to create different types of starburst effect in Photoshop, just stretch your imagination.
How to create a starburst effect in Photoshop:
Hard Edged Starburst effect:
Step 1: First create a new document with the default white background. Make the shape square, I have chosen 600px by 600px, square images yields better results. You can always crop the image later as per your requirement.
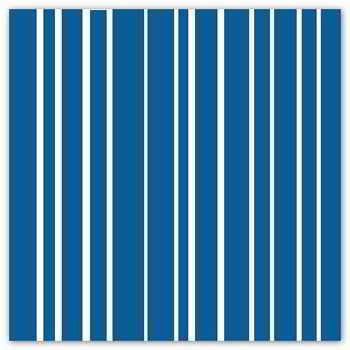
Add a new layer above this layer. Make this new layer active. Now select the Rectangular Marquee tool and draw several vertical rectangles of different sizes across the new layer you just created.
Choose the paint bucket tool and fill these rectangles with a color of your choice, for example here I used (#0d5c93). It’s not necessary to make the rectangle exactly as is shown in the image.
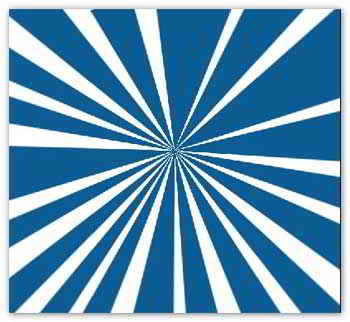
STEP 2: Next go to Filter > Distort > Polar coordinates and select the “Rectangular to polar” option and then click OK. And this what you get see in the image below. A simple hard-edged starburst effect.
This technique creates a very distinctive and attractive hard-edged starburst effect almost cartoon-like. You can end here if you like or follow the next step for a softer edge starbursts effect.
SOFT EDGED STARBURST EFFECT:
STEP1:Create a new document of 600px by 600px (square size produces better results). Create a new layer and make a vertical gradient across the layer with the gradient tool with two different colors of your choice. Here I used these two colors #0d5c93 and #c0def3 as background and foreground color. as shown in this image.
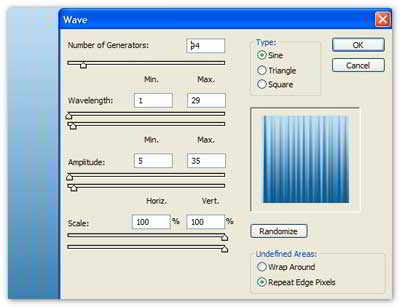
Step 2:Now go to filter > Distort > Wave and use the settings as shown here, then click OK. You can also try the Randomize button to change the wave patterns, just make sure the streaks of the two different colors are prominent or you may not get the desired effect.
Step 3: Now as above go to Filter > Distort > Polar coordinates > make sure that “ Rectangular to polar” settings are checked and then click on OK to get the final Starburst effect. This effect produces a softer edge starburst effect as you can see in the image below.
Unlike the hard-edged starburst effect, this one produces a more soft and gentle starbursts effect in Photoshop.
With these two methods, you can make a variety of Starbursts effect in Photoshop. All you have to do is make different sizes of rectangular boxes, use different colors.
You can also try different settings under the Distort > wave filter. You can also use the “Hue and saturation tool” in Photoshop to change the color to best suit your project.
That’s it. I hope you could follow the tutorial. Did you try to make one? your comments are welcome.
Hello! I am Ben Jamir, Founder, and Author of this blog Tipsnfreeware. I blog about computer tips & tricks, share tested free Software’s, Networking, WordPress tips, SEO tips. If you like my post /Tips then please like and share it with your friends.
We use cookies on our website to give you the most relevant experience by remembering your preferences and repeat visits. By clicking “Accept”, you consent to the use of ALL the cookies.
This website uses cookies to improve your experience while you navigate through the website. Out of these cookies, the cookies that are categorized as necessary are stored on your browser as they are as essential for the working of basic functionalities of the website. We also use third-party cookies that help us analyze and understand how you use this website. These cookies will be stored in your browser only with your consent. You also have the option to opt-out of these cookies. But opting out of some of these cookies may have an effect on your browsing experience.
Necessary cookies are absolutely essential for the website to function properly. This category only includes cookies that ensures basic functionalities and security features of the website. These cookies do not store any personal information.


Comments are closed.