Make your entire photo black and white except for one color or object in Photoshop. This can make your photo and your subject even more striking. Here’s how to make one object color and the rest black and white in Photoshop
In this Photoshop Tutorial lets learn how to make some part of your Photo color and the rest of the photo in to black and white.
This Photoshop tutorial is helpful when you want to put some emphasis on a part of photo as a special effect. You may have seen this effect where the main character in a photo is shown in color and the rest of the photo in black and white.
Make one object color and the rest black and white in Photoshop
Step 1
I am using Photoshop CS6, however any version would do fine. First Open your photo in Photoshop in which you want to apply this effect.
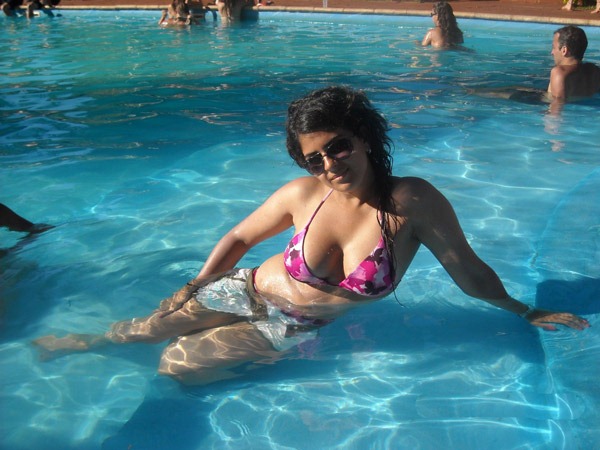
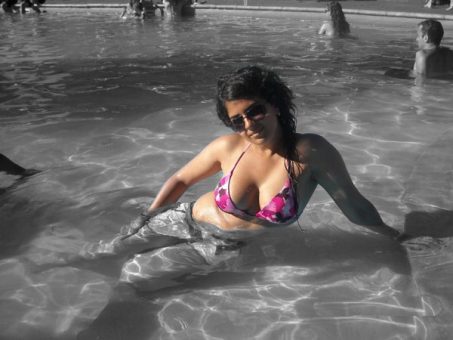
Figure out which part you want to keep colored and which part in black and white. Photos with people works well. I am using this stock photo, you can use your own or download any stock photo.
Step 2
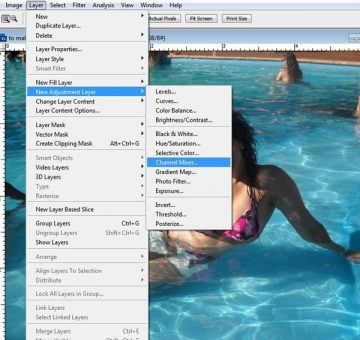
After opening the file in Photoshop menu click on – Layer – New adjustment layer – Channel mixer, as shown below. Adjustment layers automatically creates masks, which is gives great control over what ever we do on a photo.
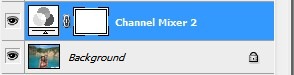
This will make a new layer as “Channel mixer 1” which will create a new layer in your layer pallet. Layer Pallet view (see image below)
Step 3 After clicking on OK on the adjustment layer Channel mixer you will get the following options window.
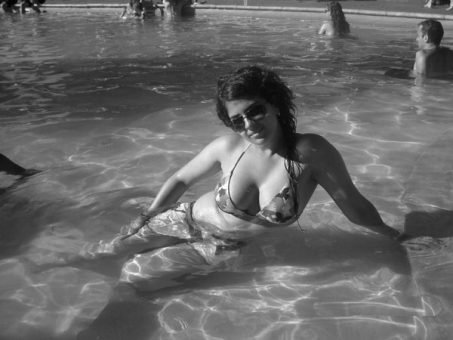
Here put a check mark on the option “Monochrome” at the bottom and click on OK.
This will turn your photo in to black and white, as shown below. Don’t worry your color photo is intact
Step 4: Now first make sure that in the color pallet of Photoshop the foreground color is black and the background color is white, this is the default Photoshop color, which can be activated by tapping on the letter “D” on your key board.
Step 5: Now select the brush tool. Set the Brush mode to Normal, Opacity to 100% and flow to 75%
Step 6: Now with the brush tool selected make sure that mask layer (layer with white color box as shown here)
in the layer pallet is selected.
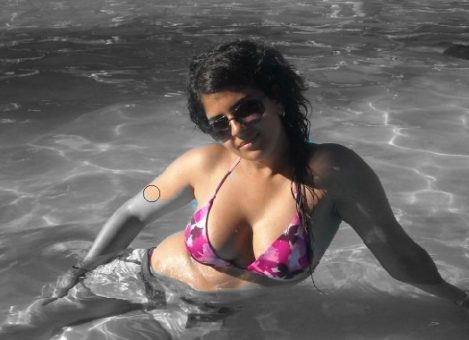
With the brush tool paint over the object which you want the color to re-appear.
Depending on the area of the photo change the brush size to reach the finer corners of the image. In this picture I am keeping the girl in color and rest of the photo black and white as shown below.
Brush over in all the portion where you want to reveal the color. If you happen to overdo, (going over the edges) than change the foreground color to white and paint over the area to undo the effect, that’s the beauty of using layer mask.
This is the result of the final picture to make one object color and the rest black and white in Photoshop
Hope this tutorial was helpful and easy to follow. You can try this effect on any photograph of group of people, where you can make one object color and the rest black and white in Photoshop
Hello! I am Ben Jamir, Founder, and Author of this blog Tipsnfreeware. I blog about computer tips & tricks, share tested free Software’s, Networking, WordPress tips, SEO tips. If you like my post /Tips then please like and share it with your friends.
We use cookies on our website to give you the most relevant experience by remembering your preferences and repeat visits. By clicking “Accept”, you consent to the use of ALL the cookies.
This website uses cookies to improve your experience while you navigate through the website. Out of these cookies, the cookies that are categorized as necessary are stored on your browser as they are as essential for the working of basic functionalities of the website. We also use third-party cookies that help us analyze and understand how you use this website. These cookies will be stored in your browser only with your consent. You also have the option to opt-out of these cookies. But opting out of some of these cookies may have an effect on your browsing experience.
Necessary cookies are absolutely essential for the website to function properly. This category only includes cookies that ensures basic functionalities and security features of the website. These cookies do not store any personal information.