Making a Time-Lapse Video is an interesting technique. It involves time-lapse photography to record a scene or objects that change slowly. Which is then played at high speed as a video.
The Time-Lapse video basically consists of a sequence of multiple Photography. Shooting a bunch of photos of the same scene which is changing slowly, spread out over a period of time.
These multiple shots are then combined together, run them in fast forward motion one photo after the other, and producing a video. Its basically showing a long scene in a very short amount of time.
Time-Lapse videos let you see the natural progression of time. Allows you to see how things progress in nature in a short time, without you waiting through the actual length of it.
For example, the sun’s movement, right from sunrise to sunset in a 10-second video.
Having said that, Now there are a few basic things you need to know in creating a Time-lapse video
Choose your subject/object on which you want to make a time-lapse video. Just for example for this tutorial I took a bunch of shots of clouds passing and made this short time-lapse video showing cloud movements.(see below)
Place camera on a tripod
:: Figure out everything first, like where to place your camera, so you can capture the scene nicely (whole frame)
:: Set your camera to take the automated shots at a preset time interval (in seconds). These days all smartphones camera has the option to take time-lapse shots.
:: Since options in smartphones are not the same, as how to set the time interval for each shot. I will explain how to calculate and give you a general idea.
:: Combine all your shots together in to a video (more on that later)
:: You can edit your video, adding titles, music etc.
Example: Time-lapse video of clouds : made with 370 frames (I shot these photos in my home town Mokokchung in Nagaland
How many time-lapse photographs to take?
You might want to know how many time-lapse shots to take to make a decent time-lapse video? And what should be the time gap (time interval in seconds or minute) between each shot?
As far as how many time-lapse photographs to take, depends on what is your subject for a time-lapse video. If you are taking a long-term event, for example blooming of a flower, germination of a seed, which may take days. You may need to take thousands of time-lapse photographs with longer intervals between shots.
Formula to calculate the time interval between photographs
What should be the time interval between the shots? Most of the movies that we see have 24 to 30 frames per second (FPS).
The more the FPS the smoother is the video, lower FPS will produce a jerky video. We also need to take into consideration how long we want the final time-lapse video to be.
Here’s how to calculate the time interval between shots. Let’s say you want your time-lapse video to be 30 seconds long with 24 frames per second
24 frames/second multiply with 30 seconds = 720 frames.
If you decide how long you want your final time-lapse video be, you can easily do the mathematics.
Say for example, at 24 frames per second (fps) for a 3-minute long video:
First, multiply the video fps with the length of the video (in seconds)
So 24 fps X 180 seconds (3 minutes has 180 secs) = 4,320 frames
What this figure shows is the number of shots if you want your final movie to be 3 minutes long.
Calculate time interval between the time-lapse photograph
Now if you decide to shoot an event or a particular scene for 24 hours (1 day), then the interval between the shots will work out as follow:-
24 hrs. is 86,400 seconds divide this with the total length of the movie (in seconds) in our case 3 minutes which is 4,320 frames (86,400/4320)= 20 seconds.
So the interval between shots should be 20 seconds. for taking an event lasting for 24 hours. This means we will need to configure the camera to take shots at every 20 seconds interval to make a smooth time-lapse video of 3 minutes long.
I hope I made it clear.
If you are taking a long term event, eg. blooming of a flower, germination of a seed, construction of a building, which may take days, you can use increase the interval between shots to minutes or even hours.
This will depend on what subject or event you are making the time-lapse video.
How to make the time-lapse video
Now that you got your time-lapse photograph, copy and save all your shots on your computer.
Lets now compile and learn How to make a time-lapse video.
For this tutorial, I am going to use QuickTime Pro to compile the photos and make a time-lapse video.
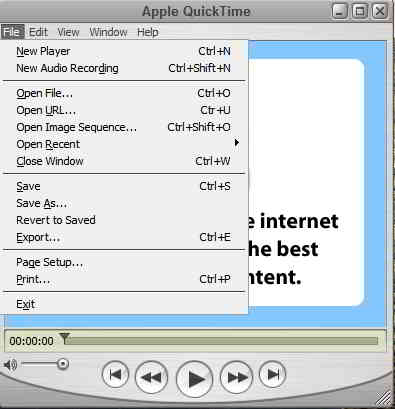
Step 1: Launch quick time pro – click on file – from the drop-down menu choose “open Image sequence” navigate to the folder where you saved the images earlier.
You need only to select the first image and quick time pro will load the rest.
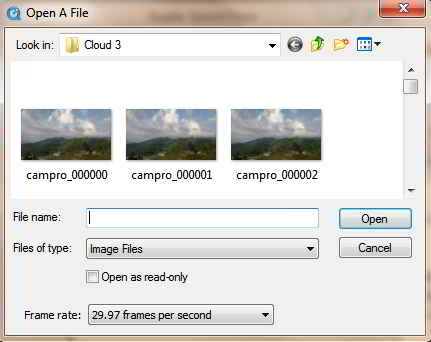
Before you click the open tab, at the bottom of this window you have to select the frame rate as shown in the above image. Because after this there is no option to change that.
Quick time will load, render the movie, and play it (Have some patients it will take some time).
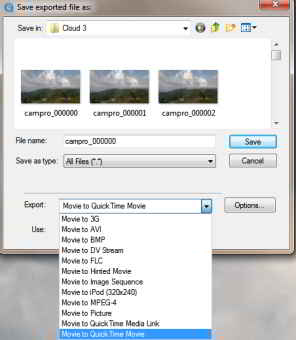
After rendering is over it will play the movie. To save click on file – export – from the drop-down menu at the bottom you will get all the options in what format you want to save your time-lapse movie.
You can save the created movie to 3G, AVI. DV stream, MPEG-4. Choose the format of your choice ( MP4 is best) and then click Save.
That’s it your Time-lapse video will be rendered and saved in the folder you specify.
Conclusion:
Time-lapse photography and making a time-lapse video is a very interesting technique. You don’t need to be a pro to create a beautiful time-lapse video. You don’t even need an expensive camera to take time-lapse photography.
These days smartphones, iPhone or Android camera apps come loaded with options to take time-lapse photography. give it a try.
Hello! I am Ben Jamir, Founder, and Author of this blog Tipsnfreeware. I blog about computer tips & tricks, share tested free Software’s, Networking, WordPress tips, SEO tips. If you like my post /Tips then please like and share it with your friends.
We use cookies on our website to give you the most relevant experience by remembering your preferences and repeat visits. By clicking “Accept”, you consent to the use of ALL the cookies.
This website uses cookies to improve your experience while you navigate through the website. Out of these cookies, the cookies that are categorized as necessary are stored on your browser as they are as essential for the working of basic functionalities of the website. We also use third-party cookies that help us analyze and understand how you use this website. These cookies will be stored in your browser only with your consent. You also have the option to opt-out of these cookies. But opting out of some of these cookies may have an effect on your browsing experience.
Necessary cookies are absolutely essential for the website to function properly. This category only includes cookies that ensures basic functionalities and security features of the website. These cookies do not store any personal information.