If you have been blogging for some time, by now you already know that optimizing your images before uploading to the website can have a huge impact on your website speed.
If you are a blogger or own a website, I am sure you are uploading images too. As it is said, “A picture speaks a thousand words”.
But then if you upload images without optimizing, it will slow down your site drastically.
New bloggers and beginners simply upload images without optimizing them for the web.
Images are known to increase page size and loading time. That’s not good for your readers and definitely not for SEO point of view.
In this article, we will show you how you can optimize your images for faster web performance without losing quality.
Here’s how to optimize images for the web with Photoshop
This is a very simple step-by-step Photoshop tutorial where You can easily optimize images with Photoshop in a few steps.
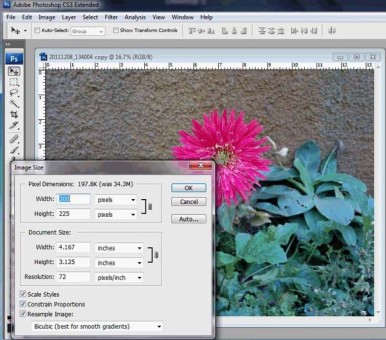
Step 1: Open your image in Photoshop. From the Menu click on Image > Image size – Photoshop will show the present size of the image in pixels.
Make sure to keep the resolution at 72 and check the box that says “Constrain proportions” at the bottom.
Under the Width and Height at the top, you can put the size (in pixels) according to your choice. But since we are optimizing it for the web, the smaller the size the better.
A size of 300 px to 400 px should be good enough for the web.
Since we have already checked the “Constrain proportions” whatever figure (size) you input under the width, the height also will be automatically calculated.
Then click on OK, Photoshop will resize your photo.
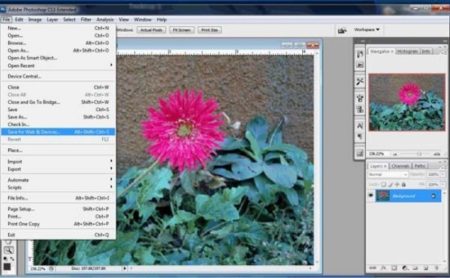
Step 2: If you want to do some tweaking to your photo, like color adjustment, sharpness, etc, you can do it now before saving it for the web.
Step 3: Now it’s time to save it. Click on the File menu and from the drop-down menu choose “ Save for Web and Devices” as shown below.
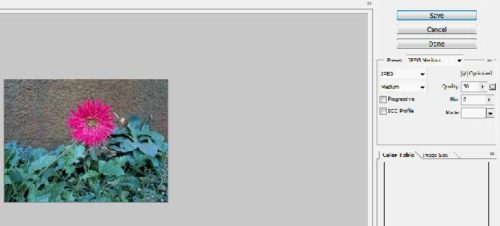
Step 4: In the save for web and devices window, you will get the following options.
On the right panel check the box “Optimize” (by default it should be checked).
From the preset choose JPEG Medium. You can adjust the quality slider, I found quality between 30 to 45 is good enough.
At the bottom left you will be able to see the image size as you adjust the quality slider. Higher the quality larger the image size.
Now click on the Save button. Photoshop will save your optimized image in the folder you specify.
That’s it. with this simple 4 step, you can easily optimize images for the web.
You can play around with the settings in Photoshop if you are not satisfied with the outcome.
For example, in the quality section you can use “High” instead of medium, but remember the size of the Image will increase, defeating the very purpose of this tutorial.
Here is a short video, if you prefer a video tutorial
Hello! I am Ben Jamir, Founder, and Author of this blog Tipsnfreeware. I blog about computer tips & tricks, share tested free Software’s, Networking, WordPress tips, SEO tips. If you like my post /Tips then please like and share it with your friends.
2 thoughts on “How To Optimize Images For Web With Photoshop”
That’s a real good TIPS, fits nicely with your Blog Title. Must say nice tutorial and easy to follow. I will be expecting more Photoshop tutorials from you. Great JOB.
Hello Brendan
Thank you for visiting my Blog. I am pleased that this TIP was helpful to you. You can bet, there will be more Photoshop tutos coming. Thanks again.
Comments are closed.
We use cookies on our website to give you the most relevant experience by remembering your preferences and repeat visits. By clicking “Accept”, you consent to the use of ALL the cookies.
This website uses cookies to improve your experience while you navigate through the website. Out of these cookies, the cookies that are categorized as necessary are stored on your browser as they are as essential for the working of basic functionalities of the website. We also use third-party cookies that help us analyze and understand how you use this website. These cookies will be stored in your browser only with your consent. You also have the option to opt-out of these cookies. But opting out of some of these cookies may have an effect on your browsing experience.
Necessary cookies are absolutely essential for the website to function properly. This category only includes cookies that ensures basic functionalities and security features of the website. These cookies do not store any personal information.


That’s a real good TIPS, fits nicely with your Blog Title. Must say nice tutorial and easy to follow. I will be expecting more Photoshop tutorials from you. Great JOB.
Hello Brendan
Thank you for visiting my Blog. I am pleased that this TIP was helpful to you. You can bet, there will be more Photoshop tutos coming. Thanks again.