Have you come across a web page or a blog with the author’s signature at the end of the article? I think the signature looks great and adds a style to your post.
In this post I’m going to show you how to add a custom signature to blogger blog posts both new and existing Blog posts.
If yes then follow this instruction carefully its very easy, and is done online.
How to Create and add A Signature To Blogger Blog Post
OK then, let’s get started: How to Insert your signature in Blogpost.
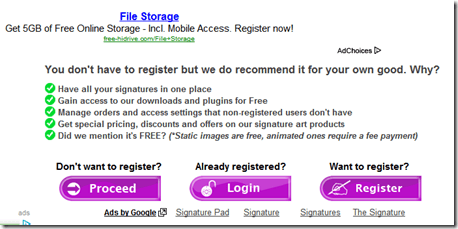
2. No need to register since this is a one time process so click on the PROCEED tab.
3. In the next window, you will get a few options (self-explanatory) just click on the first option “Using the signature creation wizard” .
4. In the next window Step 1 Enter your name here in the box, your name as you want your signature to be, first name or just the initial, up to you.
5.Than click next, you will see the following window.Samples of your signatures.The small numbered tabs on the top are different fonts, there are more than 100 different fonts.
You can click on any tab and samples of your signature will be displayed. Select the one that appeals to you most and click the radio button on its side than click NEXT…….
6.In the next window (step) here you have to chthe oose size of your signature, I choose 3, than click next…..
7. In the next step you will be asked to choose the color. There is a rudimentary color picker, to me it didn’t seem to work so I opened Photoshop choose the blue color, noted down the hex number which will be something like this #bn245d and pasted in the colour code box.Then click NEXT.
8. In the next step, you have to select the “slope” I choose 3, select your choice.Then click NEXT….
9. Your Signature is ready.Perfectly done, neat and sharp. In the next step click on “Generate a code for my handwritten signature”
10. In this last step Click on to “Generate HTML code”
Your Signature HTML code will be instantly generated and displayed as shown below.
Your signature code will look something like this. You need to copy this code and paste it in notepad and save.
Next step would be to put it in your template HTML code (don’t copy this code, your signature code will be different)
NOTE: You can delete the code in red color or simply put there your Blog URL.(keep the semicolons) Now that your code is ready,where to insert this code and how ?
There are two methods to Add the Signature Code
Method 1
1. This method is the easiest and doesn’t require you to modify/temper your template code, but the draw back is your signature will appear only in your newer posts that you publish after this, older posts wont display your signature.
To do this log on to your blogger account go to “settings” in your dashboard and than choose “Formatting” from the menu as shown below
Now scroll down then to “Post template” box and paste your code there and click on save settings as shown below.You are done, you can preview your blog, but remember, only your newer blog will start showing your signature at the bottom of your post.
Method 2
On your dashboard – got to – Design- Edit HTML- Check the box “expand widget” and find this code in your template.
Press Ctrl+F and copy paste the following code (either one which ever works)
<data:post.body/> or this code : data:post.body/>
If found the selected code will be highlighted in your Template HTML.
If you find two such codes in your Template than choose the second one and paste the code (Your signature code saved earlier) directly below or after the abovecode.
PREVIEW your blog, it should display your signature, save your Template and you are Done.
Since all Templates are not same don’t worry if you find the code only in two instances. DON’T FORGET TO PASTE YOUR SIGNATURE CODE AFTER THE SECOND ONE.
If it does not show your signature in the preview, paste the same code after the first instance the code appears on your template.
Hello! I am Ben Jamir, Founder, and Author of this blog Tipsnfreeware. I blog about computer tips & tricks, share tested free Software’s, Networking, WordPress tips, SEO tips. If you like my post /Tips then please like and share it with your friends.
4 thoughts on “How To Add A Signature To Blogger Blog Post”
with that signature your Blog really looks "Style" I am going to try right now.Appreciate for sharing this.
Very beautiful indeed. I was really looking for such a tutorial/post. I am glad i found this. Right now im already on it.Very good post.
Thanks Jenny.Thank you for visiting, glad it was of help to you.
Rahul India Thank You.after you are done do let me see your creation too.
Comments are closed.
We use cookies on our website to give you the most relevant experience by remembering your preferences and repeat visits. By clicking “Accept”, you consent to the use of ALL the cookies.
This website uses cookies to improve your experience while you navigate through the website. Out of these cookies, the cookies that are categorized as necessary are stored on your browser as they are as essential for the working of basic functionalities of the website. We also use third-party cookies that help us analyze and understand how you use this website. These cookies will be stored in your browser only with your consent. You also have the option to opt-out of these cookies. But opting out of some of these cookies may have an effect on your browsing experience.
Necessary cookies are absolutely essential for the website to function properly. This category only includes cookies that ensures basic functionalities and security features of the website. These cookies do not store any personal information.


 As Tabs To Blogger Navigation Bar")
 As Tabs To Blogger Navigation Bar")


with that signature your Blog really looks "Style" I am going to try right now.Appreciate for sharing this.
Very beautiful indeed. I was really looking for such a tutorial/post. I am glad i found this. Right now im already on it.Very good post.
Thanks Jenny.Thank you for visiting, glad it was of help to you.
Rahul India Thank You.after you are done do let me see your creation too.